Breaking News

IP

Showing posts with label Android. Show all posts

How to Jailbreak Iphone 3gs.

If you’re an iPhone 3GS or iPod touch 4G user and have upgraded to iOS 6.1.6, which was released recently to fix a critical SSL bug then the good news is that it is still possible to perform an untethered jailbreak on your iOS device using a combination of Redsn0w and p0sixspwn.

In this article we show you how to jailbreak iOS 6.1.6 first using Redsn0w, and then converting it into an untethered jailbreak using p0sixspwn Cydia package.
Update (June 17): Please note a new version of p0sixspwn has been released which adds support for iOS 6.1.1, so you can use p0sixspwn directly to perform the untethered jailbreak on your device running iOS 6.1.6, instead of using this workaround. You can check out our step-by-step guide on how to jailbreak iOS 6.1.6 using p0sixspwn. If you’ve any problem with that method then you can use this workaround.
Here are some important points to note before you proceed.
  • This guide is meant for iPhone 3GS and iPod touch 4G users as iOS 6.1.6 is compatible with only these devices. If you’re looking for a jailbreak for iOS 7 or higher then checkout our jailbreak page for links to the latest tutorials.
  • Warning: If you depend on Ultrasn0w to unlock your iPhone, then DO NOT update to iOS 6.1.6.
  • Please note that jailbreaking your iOS device may void your warranty and hence proceed with caution and at your own risk.
  • Please do not forget to backup your iOS device before you proceed. You can refer to this post for instructions on how to backup your iOS device using iCloud orthis one to backup your iOS device using iTunes.
  • Please ensure you are running latest version of iTunes.
  • This method uses an iOS 6.0 jailbreak with the iOS 6.1.6 filesystem, so it could cause some unknown issues.You can follow these step-by-step instructions to jailbreak your iPhone 3GS and iPod touch 4G on iOS 6.1.6:
    Step 1: Download Redsn0w 0.9.15b3 (Redsn0w 0.9.15 beta 3) from this link and save the application in a folder named “Redsn0w” on your desktop.
    Step 2: Download iOS 6.0 firmware file (yes, the trick is to point Redsn0w to the iOS 6.0 firmware file and NOT iOS 6.1.6 firmware file) for your iOS device from the links mentioned below:
    • iPhone Note: Please ensure you download the correct iOS 6.0 firmware file for your iPhone model. Check this link if you need any help in identifying which iOS firmware file to download for your iPhone model.
    • iPod touch
    Step 2: Connect your device to the computer and double click the Redsn0w zip file and extract the application. Navigate to the Redsn0w folder and launch the Redsn0w application.
    Windows 7 users should run the exe in Windows XP compatibility mode (right-click on the Redsn0w exe and select Properties, then select the Compatibility tab and select Run this program in compatibility mode for Windows XP). Windows XP and Windows 7 users should run Redsn0w as ‘Administrator’ (right-click on the Redsn0w exe and select ‘Run as an Administrator’).
    Step 3: Click on Extras button.
    Step 4: Then click on the Select IPSW button. Navigate and select the firmware file download in Step 2. It should successfully identify it and inform you that it will be used in the rest of the session.
    Step 5: Go back to Redsn0w’s main page and click on the Jailbreak button.
    Step 6: Redsn0w will now start preparing the jailbreak data.
    Step 7: You will now be prompted to select the jailbreak options. Make sure Cydia is selected and click on the Next button to continue. You can also select Enable battery percentage option.
    Step 8: You will now be prompted to put your iOS device into the DFU mode. Turn off your device, however keep it plugged in to the computer.
    Step 9: Click on the Next button. Redsn0w will take you through the necessary steps:
    (a) Hold the Power button on your iOS device down for 3 seconds:
    (b) Now simultaneously hold the Home button and keep the two buttons pressed for 10 seconds:
    (c) Now release the Power button while keeping the Home button pressed until Redsn0w detects the device:
    Note: Check this tutorial if you’re having trouble putting your device in DFU mode.
    Step 10: Your iOS device should reboot now. Please remember to release the Home button.
    Step 11: Your iOS device will reboot again and Redsn0w will now begin uploading the new RAM disk and kernel.
    Step 12: You will be notified once the jailbreaking process is complete. Click on theQuit button to exit the application.
    Step 13: The rest of the process will take place on your iOS device, wait for it to complete. Your iOS device will reboot once again (which could take approximately 5 minutes). You will now see the Home screen on your iOS device, but Cydia would still be missing, that’s because you still need to tether boot your iOS device using Redsn0w. So follow the steps mentioned below.
    Boot tethered:
    Step 14: Launch Redsn0w again.
    Step 15: Click on Extras button.
    Step 16: Then click on the Select IPSW button. Navigate and select the firmware file downloaded in Step 2.
    Step 17: Then click on the Just Boot button.
    Step 18: You will now be prompted to plug your iOS device to the computer and switch it OFF again. Follow the instructions and click on the Next button to move to the next screen:
    Step 19: You will now need to put your iOS device into the DFU mode. Redsn0w will take you through the necessary steps:
    (a) Hold the Power button on your iOS device down for 3 seconds:
    (b) Now simultaneously hold the Home button and keep the two buttons pressed for 10 seconds:
    (c) Now release the Power button while keeping the Home button pressed until Redsn0w detects the device:
    Step 20: Redsn0w will recognize the iOS device in DFU mode and apply the limerain exploit (remember to release the Home button). Your iOS device will reboot and a pineapple logo will appear, indicating a tethered boot.
    Step 21: Wait for the process to complete, once it is complete, you should see the Lock screen on your iOS device.
    Your iPhone or iPod touch has now been successfully jailbroken and you should see Cydia on the Home screen. If you don’t find it on the Home screen, please don’t panic, search for it using Spotlight. The jailbreak is currently a “tethered” jailbreak,
    Convert Tethered Jailbreak to Untethered Jailbreak using P0sixspwn:
    Step 22: Launch Cydia. Since you’re launching Cydia for the first time, you may be prompted to do an essential upgrade. Please go ahead and do it, and then relaunch Cydia again.
    Step 23: Tap on the Search tab, and search for p0sixspwn.
    Step 24:  Tap on p0sixspwn from the search results, tap on Install, followed by the Confirm button.
    jailbreak-ios-6-1-6
    Step 25: Tap on Return to Cydia when prompted.
    That’s it, your iOS device has now been successfully (untethered) jailbroken.
    Troubleshooting Tips:
    1. Can’t find Cydia: 
    If you can’t find Cydia on the home screen then double check you have tethered boot your device. Please ensure you’ve followed steps 14 to 21.
    2. Unsupported IPSW:
    If you get an error message informing you that the IPSW is not supported by this version of Redsn0w, then it means you’ve downloaded iOS 6.1.3 firmware file in step 2 instead of iOS 6.0 firmware file. Please download iOS 6.0 firmware file to jailbreak your iOS device running on iOS 6.1.3.
    3. Cydia closes immediately:
    If Cydia closes immediately when you try to launch it, it means that you haven’t installed p0sixspwn package from Cydia. Follow steps 22-24 mentioned above to solve this issue.
Read more ...

How to Recover deleted Files From SD Card Using Card Recovery.

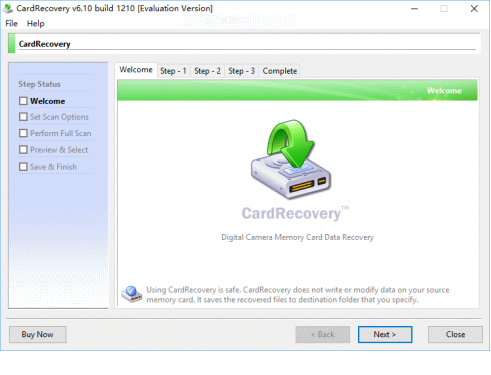
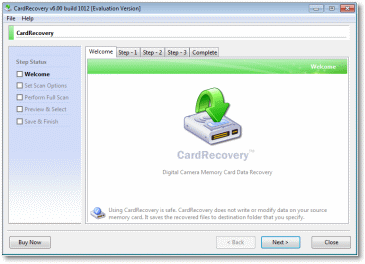
 Welcome - CardRecovery has a friendly user interface. It's very easy to use.

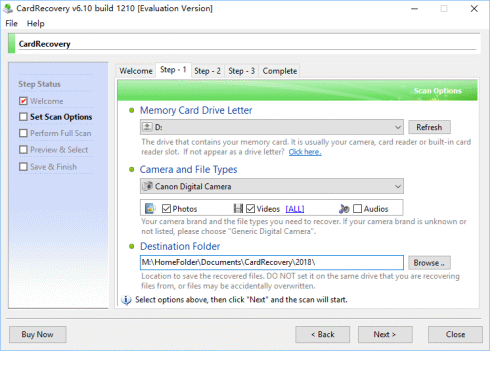
 Step 1 - Users select the drive letter, camera type and destination folder to save the recovered files.

 Step 2 - CardRecovery fully scans your memory card. The scan process is very fast and takes just three minutes to fully scan a 1GB SanDisk SD Card in our test.

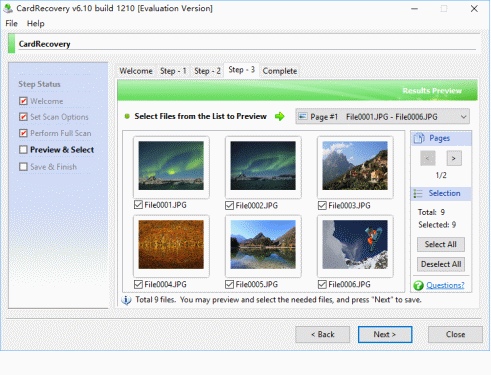
 Step 3 - CardRecovery allows you to preview and select the needed photos before saving.

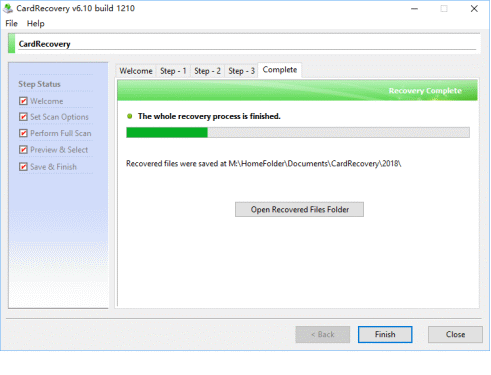
 Complete - CardRecovery saves the recovered photos to the destination folder.

Read more ...

Memory Card Recovery Sofware.

CardRecovery™ is the leading photo recovery software for memory card used by digital camera or phone. It can effectively recover lost, deleted, corrupted or formatted photos and video files from various memory cards. It supports almost all memory card types including SD Card, MicroSD, SDHC, CF (Compact Flash) Card, xD Picture Card, Memory Stick and more.

Card Recovery Screenshot
Picture Recovery

CardRecovery is
Easy and Fast.

Download Free Trial Now!
Version: 6.10 Size: 826 KB
Download Card Recovery

CardRecovery, the award-winning digital photo recovery software is the reliable solution for digital image recovery, digital picture recovery, digital media recovery, photo rescue, photo restore, data recovery, or whether files were deleted, the storage was damaged or formatted.

Our unique and exclusive SmartScan technology completes those impossible recovery tasks that other software cannot touch -- SmartScan quickly locates and restores files that other recovery software could never find.

Using CardRecovery is safe and risk-free. The software performs READ-ONLY operations on your memory card. It doesn't move, delete, or modify the data on the card to avoid causing further damage or overwriting. It recovers the photos and movie clips from the source memory card and saves them to the destination location you specify.
 CardRecovery Features
  •  Recover deleted photos from memory cards
  •  Recover lost photos from memory cards
  •  Recover lost movies from memory cards
  •  Recover photos from formatted memory cards
  •  Recover photos from damaged, unreadable or defective memory cards
  •  Recover pictures from removable storage including flash drives
  •  Recover images, video files from mobile phones
 Supported Storage
  •  Secure Digital card, SD card, SDHC, miniSD, MicroSD (TransFlash) card recovery
  •  Compact Flash card, CF Type I, Type II, MicroDrive, CF card recovery
  •  Memory Stick, Memory Stick Pro, Duo, Pro-HG, XC, Micro(M2) recovery
  •  MultiMedia card, MMC card recovery
  •  SmartMedia, flash card recovery
  •  xD Picture card recovery
  •  Cellular phone, mobile phone memory card and digital media recovery
  •  MicroSD or MicroSDHC card used by Android smart phone
  •  USB flash drive digital image recovery
 Supported Situations
  •  Photos deleted accidentally or intentionally from memory cards
  •  Photo loss due to formatting or "Delete All" operation
  •  Memory card error or damage, or inaccessible memory card
  •  Corruption due to the card being pulled out while your camera is on
  •  Damage due to turning your camera off during a write/read process
  •  Data corruption due to critical areas damage e.g. FAT, ROOT, BOOT area damage
  •  Data loss due to using between different cameras/computers/devices
  •  Other events that could cause damage to data
 Supported Photo/Video File Types
  •  Common Picture Formats: JPG JPEG TIF
  •  Common Video Formats: AVI MPG MOV MPEG ASF MP4 3GP MTS
  •  Common Audio Formats: WAV MP3 AMR
  •  RAW Image Formats: Nikon NEF, Canon CRW and CR2, Kodak DCR, Konica Minolta MRW, Fuji RAF, Sigma X3F, Sony SRF, Samsung DNG, Pentax PEF, Olympus ORF, Leica DNG, Panasonic RAW and more
 Supported Camera and Phone Brands
  •  Nikon, Canon, Kodak, FujiFilm, Casio, Olympus, Sony, SamSung, Panasonic
  •  Fuji, Konica-Minolta, GoPro, NEC, Imation, Sanyo, Epson, Ricoh, Pentax
  •  LG, SHARP, Lexar, Mitsubishi, JVC, Leica, HP, Toshiba, SanDisk, Lumix
  •  Polaroid, Sigma and almost all digital camera brands in the market
  •  Android, BlackBerry and other smartphones (excluding iPhone) in the market
  •  Android mobile phones including Samsung, Nexus, HTC, Motorola DROID and more
 Supported Flash Memory Card Manufacturers
  •  SanDisk, Kingston, KingMax, Sony, Lexar, PNY, PQI, Toshiba, Panasonic
  •  FujiFilm, Samsung, Canon, Qmemory, Transcend, Apacer, PRETEC, HITACHI
  •  Olympus, SimpleTech, Viking, OCZ Flash Media, ATP, Delkin Devices, A-Data
  •  and almost all digital camera memory card brands in the market


 System Requirements
  •  Microsoft Windows 98/2000/XP, Vista, Windows 7, Windows 8, and 8.1
  •  Free hard drive space 256 MB or more for storage of the recovered photos
  •  A memory card reader if your camera does not appear as a drive letter
Read more ...

Hidden Features Of Andriod Lolipop 5.0

Android 5.0 Lollipop is quite possibly the most hotly anticipated Android update ever. The new software brings with it a number of key changes as well as battery life improvements and performance enhancements, but the one thing Android fans are anticipating most eagerly is the new look of Android 5.0. Material Design rockets Android into the future in terms of its appearance, and its guiding principles will also help third-party app developers improve their software.
Of course, Lollipop is about much more than a new look, and we regularly share guides that will help you get the most out of Android 5.0.
Mobile blog Phone Arena has compiled a nice list of 20 hidden features in Android 5.0 Lollipop. Some of them are more “hidden” than others, but each and every one will be of use to people lucky enough to already have Lollipop, and to those who will get their hands on it soon.
Tap--amp-Go
First and foremost, did you know that Android 5.0 includes a great new “Tap & Go” feature? If you’re upgrading from an older device to a new smartphone or tablet with Lollipop, you can transfer all of your accounts and data from your old phone with a simple tap.
Another cool Android 5.0 feature lets you search the phone’s settings app, rather than having to try to remember where the setting you’re looking for is located. Want to adjust the phone’s brightness? Just start typing “brightness” or “display” and you’ll find it.
Hide-sensitive-notifications-from-your-lockscreen
There is also now a built-in flashlight function in Lollipop that’s accessible on the quick settings pane, which also now lets you quickly and easily access your alarms.
Android 5.0 gives users much more control over notifications, as well. With Lollipop, users can easily hide sensitive notifications from the lock screen or disable lock screen notifications altogether.
For more information on these Android 5.0 features and more, follow the link below in our source section.
Read more ...

Use Both Packet Data And WiFi For Boosting Internet Speed

If you are here then you may be boost up with your internet speed on your mobile.You may find it easy to use internet on mobile by connecting to your Home or business WiFi for faster access well, as human mentality every one wants more and more speed while using internet .If you are one of this type then you are at right place. Here today i am going to introduce you to the app that may assist you to use your net pack and WiFi at a same time for quicker net. Although,at least once while using internet you might have a question that can i use packet data and WiFi at same time.Generally it is not possible because as soon as you turn on you WiFi your packet data got disconnected. and now here at i am going to introduce you to one such apps that will help you to do use packet data and WiFi at same time So now without wasting way more time lets come back on this superb however useful trick.

Requirements:

1. Rooted android device of version 2.2 or higher
2. WiFi and Packet Data available at same time
3. Need to Donload “Super Download” App for Android [Paid Version Link] [Free Version Link]
Just click on download link and if this application recognize your it , it will start downloading that thing itself, but if this method doesn’t work then click and hold the link and then from the menu that will appear click on “Share with” and then choose SuperDownload. Finally you can copy and then paste URL In “Add URL” Dialog  and you can can set to speed up your download.

Some Instructions:

  • Using Both of the networks, packet data and WiFi require root access in your android. And also remember to say “authorize” to the superuser prompt.
  • As you are using WiFi along with your packet data ,  you may incur in additional charges from your network operator for using packet data only.
  • To make the software use it’s full power , this software requires good  and balanced WiFi And mobile packet data without any dis connectivity.
  • If you are having good WiFi, still you need 3G or 4G network to make software to work at it’s fullest
  • Using Both connections is not supported by some devices
  • Some web server may not provide to much downloading speed as will your packet data and wifi will give simultaneously.
  • Currently only http and https protocols are supported (no ftp or torrent yet)
  • The Lite version or free one  has a file-size limit of 50 megabytes.
Read more ...

How to Run WhatsApp On Pc

Hello everyone, I would like to share about the method to run WhatsApp using Bluestacks for PC. Whatsapp is one of the most famous messaging app available for smartphones, so people who don’t own a smartphone but they like to use it via their laptops or computers. As there are many Android Emulator but we using most popular android emulator called Bluestacks. So lets start here

Requirements :-

  • A PC/Laptop running on windows XP,7,8,8.1.
  • Download Android Emulator Bluestacks.
    Download BlueStacks for Windows.
    Download BlueStacks for Mac OS X
  • A internet connection.
Step 1: First of all download the Bluestacks emulator from theabove provided links.
Step 2: Now Open the Bluestacks and search for “Whatsapp” in the top search bar.

Step 3: Now Click on the Install button at the right side.
Step 4: Wait for Bluestacks to automatically download and install Whatsapp for PC.
Step 5: Now when the installation process completes. Then just click on My Apps.
Step 6: After that open Whatsapp and verify your phone number.


Read more ...

How To Use Android As Mouse and Keyboard.

In this post i’m talking about how to use android as a mouse and keyboard, But did you know that you can turn your Android phone into a remote control? With gPad, your Android-powered smartphone can let you control your mouse cursor and keyboard from a distance. Smartphones are fast becoming a necessity with current generations. You use it to maintain your physical and online presence with it, so long as there is a secure Internet connection and you have the right app to get you connected. In fact, with the right app, smartphones can be the perfect alternative to any working device out there especially since your smartphone follows you everywhere you go.
android gpad 300x240 How To Use Android As Mouse and Keyboard
1 ) First of all, you need to download and install gPad client on your android device.
2) Now you need to install gPad server client on your Windows & Mac  PC.

3 ) When installation is done, you need to pair both your smartphone to your PC or Mac through Bluetooth, USB cable or connected under the same WiFi connection (If you are using WiFi connection, make sure you know your computer’s IP address, you may need them in the phone setup in case the connection fails). The pairing must be done before proceeding with the next step.

4 ) Open the gPad application from your computer and leave it active.


5 ) Now open the gPad application on your phone, select ‘Settings’ and then select the ‘Connection type’. In the connection type, select between WiFi, Bluetooth and USB connection.

6) After the connection type is selected, go back to the “Settings” page, scroll down to the relevant setting (Bluetooth, WiFi or USB) and click “Scan“. Select your computer as the pairing device.
7 ) If you see on the Settings page an option to input “IP address”, this is where you place your computer’s IP if your connection fails via WiFi.
8 ) Now go back to the gPad main menu on your phone, click open “touchpad“, and you should now be able to remotely control your computer’s cursor from your phone. This is possible for as long as your phone is still connected to your computer via Bluetooth, WiFi or USB cable.
gPad2 How To Use Android As Mouse and Keyboard

9) You can now turn your smartphone into a remote control for your computer. Use your mouse to control your laptop, PC or Mac from afar, or you can navigate through your powerpoint presentation slides or through video presentations with configured touchpads. As you can see below, there are plenty more remote controllers you can download and start using.
gPad3 How To Use Android As Mouse and Keyboard

Conclusion:

If you like watching movies on your laptop, this can be your own makeshift remote controller; if you are a teacher, this will put your Android to good use with your class lessons and presentations. How else would you put this to good use? Let us know in the comments section below.
Read more ...

Security Tips for Android Users

Security Tips for Android Users Security Tips for Android Users

Security is a major concern many people have in this modern technological era. With more and more people using android devices, the mobile industry is becoming more appealing to would-be hackers and data phishers. I believe that anything can be “hacked”, to use the term loosely. There’s no such thing as 100% security when it comes to something as vast and interconnected as the world wide web.

1 ) Avoid public WiFi when possible

I’m not saying that public WiFi is a big security threat, it’s not. But when I want to do any online banking, I always do so from my own personal WiFi at home. Or my smartphone’s data plan. I never do online banking on a public WiFi network, where many other strangers can easily connect to it as well. I’m not educated in the field of cyber security, but when you want to send sensitive information online, like your online banking account password to your bank’s servers, it just makes sense to do so from a network you trust (like your home network) rather than a public network that hundreds of people (including data phishers) have access to, doesn’t it?

2 ) Activate Android Device Manager

Read full post:- Find Lost Android Mobile Easily Losing your device is a double blow. Losing your device is bad enough, but losing the data on the device can be devastating. In addition to the malware scanner mentioned earlier, Google also pushed the Android Device Manager, again via Google Play Services to all Android devices. ADM is a service that aims to help users who have lost their device. It will allow users to locate their device, lock it, or wipe it clean regardless of where it is. Activating ADM on your device is extremely easy. All you need to do is go into the Google Settings app (not to be confused with your device’s Settings app), go to “Android Device Manager” and enable both options that are displayed. This will allow you to remotely locate your device, lock it, erase it, and even make it ring on full volume. To access ADM from the web, go to . From there you will be able to use all the features you just activated on your device. You can also access ADM from the Play Store on the web. On the Play Store home page, click the settings button (the gear) located in the top right corner of the page (beneath your user bar) and select Android Device Manager. With this service fully enabled, hopefully you will be able to soften the blow if you unfortunately lose your device.

3 ) Disable app downloads from unknown sources

The easiest way to get infected with malware on an Android phone or tablet is to start installing apps from outside the official Google Play app store. In the Settings menu of any standard Android device is a check box that enables and disables installing ‘unofficial’ apps. An Android that keeps itself legit is far safer.

4 ) Download an anti-malware app

Now that Android malware and viruses are a widely-recognised part of the smartphone world, there are many solutions to combat them. Most of the big antivirus (AV) companies have their own Android anti-malware apps, including Kaspersky, AVG, Avast and Norton. Recommended free Android AV apps include Lookout (where there is also a premium version available) and TrustGo.

5 ) Keep all sensitive data behind an extra encryption layer

Keeping sensitive information logged in a generic note on a phone or tablet is a bad idea. There are plenty of apps that will store information behind a double wall of password protection and encryption. Download mSecure oFile Hide Expert.

6 ) Always Use Chrome browser

Since Android 4.1 was introduced, phones and tablets have come with the stock Android browser as well as Chrome installed as standard. Chrome is marginally more secure than the stock version, having been subject to fewer publicised insecurities in recent months. It is also likely that Chrome for Android is being more keenly worked on, its pre-installed status marking it out as the future default browser for Android.
If you face any problem regarding ‘security tips for android users’ feel free to share in below comments, Keep Supporting Please share this post !
Read more ...

Leave A Message!!

foxyform
Designed By TricksCorner